|
Laser Boresight Target
Laser boresighters often come only with a generic boresight target that approximates a typical hunting rifle zeroed at some typical range using some typical ammo and requires the boresight target to be placed at some specific distance downange. Such one-size-fits-all targets likely didn't meet the needs of many shooters and certainly don't utilize the superior accuracy of SiteLite laser boresighters. Ballistic Explorer now includes software similar to what we developed
at the request of Rich Langner, President of Concept Development Corporation,
makers of SiteLite
laser boresighters, to help shooters get the most out of their SiteLite
laser boresighters. Now you can take advantage of Ballistic Explorer's
many advanced features in calculating accurate bullet paths in various
environments (not just standard condition) and printing a sight in target
that matches your needs. |
||
|
The Laser Boresight Target window graphically displays the relationship between the LOS (Line Of Sight) and the beam of a laser boresighter and can print a target that can be used at shorter ranges to sight in a gun at much longer range. It's not as accurate as actually sighting in with live ammo at a shooting range, but given a high quality laser boresighter and attention to details the results can be impressively accurate. To open click Laser boresight target... in the Tools menu.
|
 |
|
|
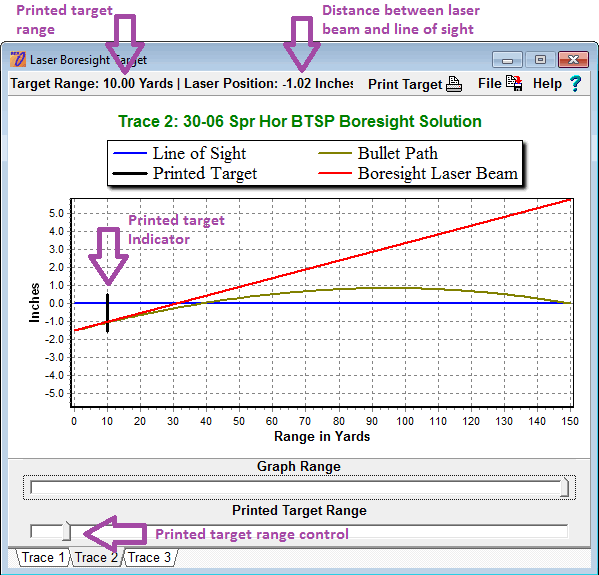
Laser Boresight Target Window
The Laser Boresight Target window displays the bullet path from the muzzle to the range selected in the Zeroed Rng parameter, or to a shorter range by using the Graph Range control just below the graph. The Printed Target Control selects the range of the printed target, which is indicated on the graph as a vertical line. Click on either side of the Printed Target Control's pointer to change the target range by 0.01 yards (meters) per click. The target indicator's color is BLACK when the target can be printed on Letter size 8.5"x11" (22x28cm) paper. The target indicator's color is GRAY when Legal size 8.5"x14" (22x36cm) paper is required. The target indicator's color is SILVER and the Print Target button is disabled when a target cannot be printed. Only Letter and Legal paper sizes are supported. The Laser Boresight Target window shows the Target Range and Laser Position near the top of the window as shown in the above image. Use the tabs at the bottom of the window to select the Trace you want to work with. Reduce the range of the graph to get a better view of the Target range as shown in the image below.
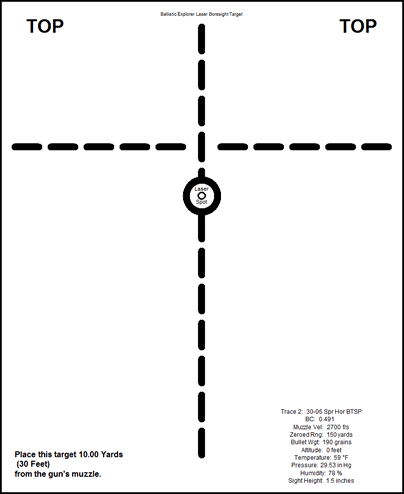
The bullet path and laser beam always start out the distance from the line of sight (see the graph key) as set by the Sight Height parameter, which is 1.5 inches in this example. The laser beam shows the center bore of the gun's barrel, also known as the Line Of Departure (LOD). While the bullet begins to drop as soon as it leaves the barrel, it's not apparent until about 14 yards in this example. Ballistic Explorer calculates the sight adjustment angle requires to zero the bullet at the range specified and by knowing that angle the distance between the Line Of Sight (LOS) and the laser beam can be calculated for any range. We can see in the image above that the the Line Of Sight and laser beam intersect at about 31 yards, which is ideal for boresighting. However, you may not have 31 yards available, particularly indoors. In that case use the Printed Target Range control to move the target indicator to the longest range you do have available for boresighting, then click the Print Target button. A dialog opens that allows you to select printer, paper size, and preview the target. Then when ready you can print out the target as shown in the image below.
Place the printed target at the specified distance downrange from the gun's muzzle (as printed on the target) and then adjust the sight settings so that the gun's aim point lines up with the printed crosshair while the laser is centered within the printed laser spot. While not a necessity, having a gun vise or rest makes it a lot easier to do accurately. |
||